
The task is really pretty simple. Just download and enable the Views module, then in the Views configuration interface enable the Tracker view. Yup, coming bundled with the Views module is a predefined view which does every task the Tracker module does.
That's it? We're done?
Maybe, depends on what you want to do. If you just want the default behavior then why not simply use the tracker module? Since it's a view we can do so very much more.
To get started with this simply hover your mouse at the top of the view (just below where it says 'Recent Posts'). This is a feature of all Views, those with sufficient permission to modify views are shown some links to edit, export or clone the view. Hover your mouse at the right spot, click on the Edit link, and enter the Views configuration panel.
Node type
First modification to suggest is to remove the node type. Listing the node type doesn't seem very helpful to me. There might be a valid reason for it to be there but I cannot imagine what it is.
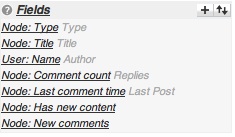
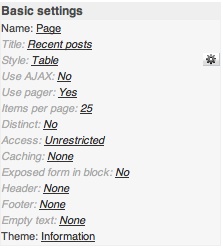
The Tracker view is a table, which you can see in the Basic Settings. The columns in a views table are determined by the Fields as shown here. To remove one of the columns from the table do the following.
- Click on the field name, in this case "Node: Type"
- Notice that a little form appears below. You may have to scroll the screen down a ways.
- This form lets you tailor details of how the column appears in the table. However our task right now is to remove the column. Simply click on the button named 'Remove'.
- Voila, it's gone. Views will show a preview below of the table as it appears now.
It's important to note that the view itself hasn't been modified as yet. To actually modify the view click on the 'Save' button. If you decide to abandon the change click on the 'Cancel' button, and it will be as if you hadn't done anything.
Changing the order of the columns
Suppose you want the columns in a different arrangement. For example it may strike your fancy to put the nodes' owner in the first column, or maybe the date. Again, click on the Edit link and away we go.
We'll again focus on the Fields section. This time we'll use the button marked with two arrows, one pointing up, the other pointing down. This button lets you change the order of the table columns.
- Click on the button.
- Again a little form appears below.
- This form lists the column names, with a sort of 'plus' sign in front of the name.
- Simply click and drag the plus sign and it moves the column name up and down.
- Drag the names up and down until you're happy with the order.
- Click 'Update' to make the change, and then click 'Save' to save the view modification.
Making more columns sortable
By default the table is sorted by the date the node was posted or last modified. Maybe you want to sort by the title or by the user name that owns the node.
There's a row named 'Style: table' and at the right side is a button marked with a symbol that looks like a flower. Click on that button. A table is shown that lets you do a lot of formatting changes.
Let's just focus on the part that says Sortable and Default Sort. The checkboxes control which of the columns can be sorted. When a column is sortable the user can click on the column name and presto magic the table reappears in a different sort order. The 'Default Sort' column is the one on which the table starts starts out being sorted.
Simply set the buttons the way you want and save everything as before.
Making the data from two columns appear in one
Maybe you want two fields to be squeezed into one column. For example the Tracker view has two fields with this feature. The field 'Node: Has new content' appears in the Title column while 'Node: New comments' appears in the 'Replies' column. You can see in the table configuration how to make this happen. Under 'Column' simply select which column in which the field is to appear.
It may happen that when two fields are made to appear in one column that the data could be displayed backwards from the way you desire. This is controlled by the overall order of the fields as listed in the Fields section. Changing the display order requires taking the steps described above to change the column display order.
Adding a field
A useful thing to add to the table is the avatar picture of the owner of the node. It seems to add to the friendliness of a community site to display pictures along with the content, and hence display pictures in this table.
First go to the Fields section. This time we'll click on the button with a 'plus' sign on it. This obviously will add a field.
There are lots and lots (and lots) of fields potentially available to display. Lots of them. Really. To aid with getting your head around the large number of fields (lots of them) they've clumped them into groups. As you click on the popup list of group names, the form below changes the list of fields it displays.
The field we're after is in the 'User' section named 'User: picture'. There are a bunch of settings to tailor displaying the users picture, but it appears the defaults are fine. Click 'Update'.
The second step to this is to move the users picture into the column containing the users name. The two belong together, right? As described above click on the button that looks like a flower, and set the picture so it shows up in the user name column. Then when satisfied click 'Update' and 'Save'.
Create secondary Tracker's for subsets of your content
I run a forum website with a large number of forums on it. It's enough forums that there are definite clusters of related forums. It's helpful to have a Tracker for each of the clusters of forums.
This is most easily handled using the Views Clone module. Upon downloading and enabling Views Clone links show up in the Views interface labeled 'Clone'. Click on the Clone link and you're led through a process similar to creating a view from scratch. It's a little different because the new view's initial state is exactly the state of the cloned view.
First thing to do is to change: the view name and the view description.
Once you've done that you're in the edit screen for the cloned view. Notice that some data has been changed such as the view name, while the rest is the same.
Make whatever changes you want and save it, as discussed above.
To make a tracker over a subset of your content requires a Filter to select the subset. A 'Filter' is a widget in Views which limits the nodes to display. Only those nodes which are allowed by the filters are displayed in the view.
Again, click on the button with a plus sign, because we're adding a filter.
A common thing might be to filter nodes that have specific taxonomy terms. This is how the forum subset is selected because each forum has a taxonomy term. Select the vocabulary that contains the term you want to filter on. A 'dropdown' selection type shows a list of all the terms in the vocabulary, whereas the autocomplete shows a textfield that automagically shows a list based on what you type in. Pick your preference for selection type. Click on 'Update' and then you're next allowed to enter the list of terms in the filter. Simply enter the terms in the box.
Conclusion
There's a lot more that can be done, of course. Have fun.