
A problem with Wordpress is that it's hard to follow that model. Wordpress tries to make life easy - you install the code on your server, and then you can update plugins and themes and can even make a major version upgrade all from the admin dashboard. There's nothing in the dashboard about trying updates on a staging server first before pushing to a production server. You just click click click on UPDATE buttons and away you go. It's easy and simple to administer a Wordpress site this way, and so long as everything works fine it's great. But what about those times when a plugin update breaks something? Or a Wordpress major upgrade (we just went from 4.2.x to 4.3) breaks one of your plugins? Your site might have crashed, the dashboard is no longer available, your visitors are seeing a blank white page rather than your site, Google might start getting the idea you're a charlatan, etc.
It would have been better to deploy the update to a test site first - but it's unlikely you even have one - and how were you to know this plugin upgrade would break your site when you've done hundreds of previous plugin upgrades with no problem?
Let's do a little bit of review of how to set up a test version of your site. There's a couple steps which are decidedly not straightforward.
Instead of doing the stuff below, you may want to install Wordpress on your laptop instead. See http://codex.wordpress.org/Installing_WordPress#Installing_WordPress_on_your_own_Computer
(sub-)Domain for test site
If your live site is example.com, the test site could be test.example.com. Or it could be test-example.com if you want to pay for a second domain. Using a sub-domain for the test site is less expensive.
At this stage you're in the domain configuration at the domain registrar. Simply click on the action to create a sub-domain and enter "test.example.com". However, you may not need to do this step at the domain registrar site.
Typically web hosting providers take over administration of the domain name and its subdomains. If so you will not have to take this step and skip to the next step.
Web hosting for test sub-domain
Web hosting providers generally tell you that the hosting account supports "unlimited domains". You create a new hosted website by clicking a button, filling in the domain name and a few other details, and voila you have a new slot into which to install a website. While normally the domain you'd enter is "example.com" you can also enter "test.example.com" to create a subdomain of a domain you're already hosting in this account.
In many cases web hosting providers take over administration of a domain and its subdomains. If so, creating the sub-domain is done solely through the web hosting control panel, and not through the domain registrar control panel.
Once this is set up, visiting test.example.com should give you a "New Website Coming Soon" message.
Duplicate the database
Wordpress stores all website data in a MySQL database. To have a test site you need to duplicate the database so changes made on your test site occur in the test database. If you didn't do this, you'd have the test site but it would be making changes in the live production site's database and those changes would be visible to end users and you would not have avoided the risk of breaking things.
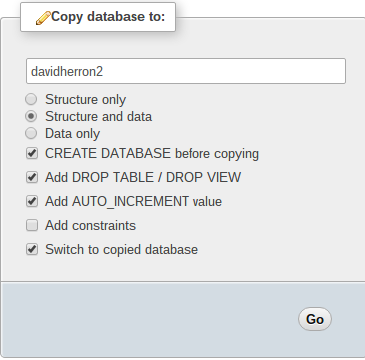
If your database is "example" then just create a new database named "example2" and duplicate the data into that database. The specifics will vary depending on the database admin control panel available to you. Shown to the right is a screen shot of part off a phpMyAdmin control panel, because that tool can directly duplicate databases for you.
The way this works in phpMyAdmin is that -- in the lefthand sidebar where your databases are listed, click on the database for your website. Then click on Operations. On the Operations page is the panel shown here. Fill in the choices as shown here, and click the Go button. It'll take a few moments, and voila your database is duplicated.
Duplicate the Wordpress code from live site into the test sub-domain site
We're getting close, there's only a couple more steps to take. Until now the steps were accomplishable by clicking buttons on the control panel. This step might not be supported by your web hosting control panel. Dreamhost doesn't do so, for example.
You might be forced to do this suboptimal thing -- use FTP to download the site files for your live site, then use FTP to upload those same files into the test site.
This method will work, but it'll be much slower than if the files could be directly copied within the web hosting control panel.
If you can access a command line, this is also useful (if you're comfortable with Unix command line, that is):
$ (cd example.com; tar cf - .) | (cd test.example.com; tar xvf -)
Edit wp-config.php to reflect new settings
You're almost ready, and while visiting the test site will let you see a working site, funny problems will crop up if you do something like log in. We have a couple settings changes to make in order that the test site is actually the test site.
Open wp-config.php in your favorite text editor, and change (or add) the following lines
define('DB_NAME', 'example2');

define('WP_SITEURL', 'http://test.example.com');
define('WP_HOME', 'http://test.example.com');
The first (DB_NAME) connects the test site with the test database we set up earlier. If you don't do this, any changes you make will appear on the live site which is decidedly NOT what's desired.
The last two lines instruct Wordpress what its domain is. Normally this is configured in the dashboard and not in the wp-config.php file. However, the duplicated database has settings from the live site, including the URL for the live site. Some things - like logging into the dashboard - will misbehave until you make this change.
Start hacking
Now you should be able to navigate to the test.example.com domain, log in, enter the dashboard, and still be on the test.example.com site. To ensure you've properly changed the database, go to Settings / General and change the name of the site (like, add TEST to the name). Click the Save button. Then go to the public facing part of the site, and verify that indeed the site title has changed. Then go to your live site and verify that the site title has NOT changed on the live site. If it changes on both sites, you've not configured the database properly.